
SpeedFan is a great utility for enthusiasts who’ve built their own PC. Besides being able to show the temperatures inside your system (from various sensors in the CPU, motherboard and HDDs) and other vitals such as voltages and fan speeds, it can also automate the cooling cycles of your machine. As its namesake implies, SpeedFan is able to automatically control your computer’s fan speeds based on the temperatures reported by various hardware sensors. This can allow you to find the right balance between a cool system and a noisy one. However, it does require some configuration, as I’ll attempt to show you in the following article.
It’s all in the details
All the material I’m about to present here is available in the help file for SpeedFan, however, since most people use the Internet for everything, myself included, I thought I’d summarize the most important points. SpeedFan has a lot of functionality and it’s easy to get lost in all of that when all you want is something simple like automatic fan control. (Some motherboards already support this, but SpeedFan brings this functionality to almost any motherboard that’s reasonably new)
First and foremost, the fans that you want to control must be plugged into one of your motherboard’s 3-pin fan headers; they cannot be plugged into 4-pin molex connectors that come straight from your power supply. This is because SpeedFan controls fan speeds’ by varying the output (using PWM) of the 3-pin fan headers on your motherboard. If you want to control the speed of your 4-pin fans, you’ll have to use some sort of fanbus or external fan controller.
Getting started
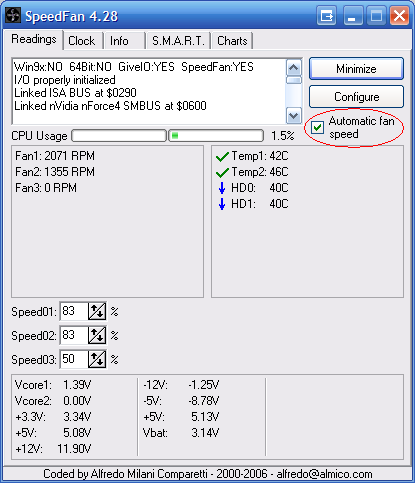
On the main SpeedFan window, you may have noticed a checkbox for “Automatic fan speed”. However, checking it is not enough to properly set it up, though it would be nice if things were this easy! For now, you can check it, but nothing will happen – you shouldn’t notice any change in your fans’ speeds.
Click on “Configure” to bring up the options window. SpeedFan is a fairly powerful program, but that means configuration is required to make it do what you want. The assumption that SpeedFan uses is that various temperatures can be influenced by the various fan speeds in your system. You need to define these relationships. For example, in my system “Temp1” is the CPU temperature. (I haven’t bothered to rename the labels) In the screenshot below, I have linked it with “Speed01” and “Speed02”, which correspond to my CPU’s fan and a case exhaust fan.
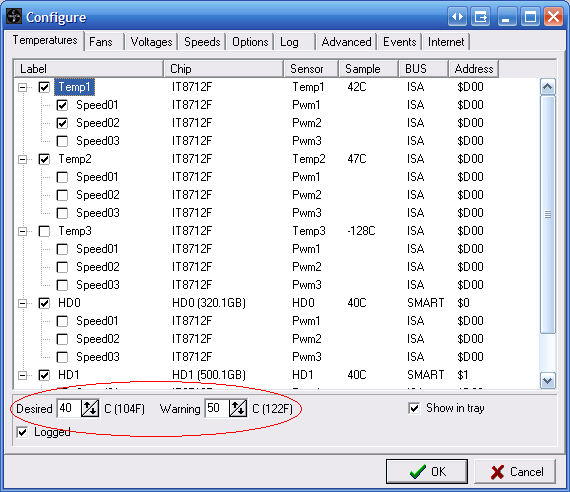
This tells SpeedFan that it should vary these fan speeds based on the temperature they’re associated with. You also need to configure threshold temperatures; there are two, “Desired” and “Warning”. The desired temperature tells SpeedFan what it should aim for. Once the desired temperature is reached, SpeedFan will begin to drop fan speeds down to some minimum you specify; if the temperature is above desired fan speeds will increase by an amount related to how much the temperature is above the desired. Once the temperature reaches the warning value, fan speeds will be set to maximum. (100%)
We now need to configure each of these fans. Go to the “Speeds” tab (not the “Fans” tab) of the configuration and you’ll see a window like this:
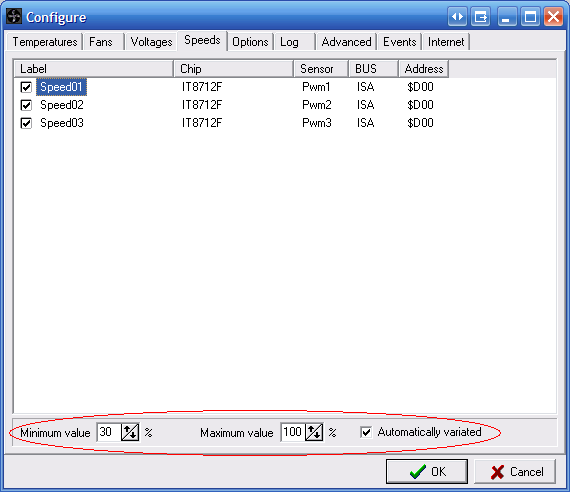
Remember that Speed01 and Speed02 are linked with the Temp1. Here is where we define the minimum and maximum fan speed values. When the temperature is at or below desired, the lowest the Speed01 will go is 30%, while the maximum I’ve specified is 100%. This range is for temperatures up to the warning value. When the temperature is at or above warning, the fan speeds linked to it will be set to 100% regardless of what you’ve define the maximum to be. This is a sort of fail safe to prevent overheating – better safe and noisy than silent and sorry. Also important to note is that you must check “Automatically variated” for each fan you want to automatically control. (This is separate from the main automatic fan speed checkbox on the main SpeedFan window we saw earlier)
You may need to experiment to find out what are the best values for minimum and maximum fan speeds. Also, some fans fail to report their rotational speed (RPM) when spinning slower, so you may get a reading of “0 RPM” within SpeedFan. You’ll need to actually check whether this is the case.
One last thing you may want to configure is how fast SpeedFan will begin to adjust fan speeds when it has to respond to a temperature change. This is accomplished by setting the “Delta value” on the Options tab of configuration:

This sets the step-size (in percent) for fan speed changes. With a larger value, SpeedFan will adjust fan speeds more quickly since it will be increasing or decreasing by that amount each time. Experiment to find what works best. I’ve found that with too large a step/delta size, temperatures and fan speeds will oscillate – basically the fans will speed up too fast, causing the temperatures to drop, which in turn cause the fans to slow down too much, which then causes temperature to rise again, completing the cycle. If you’ve taken a course in control theory you’ll realize that this is perhaps the classic example problem in control theory. (By adjusting the delta value I believe you’re adjusting the proportional value of the controller – though I am not sure if SpeedFan implements a full PID controller)
Lastly, you may want to check “Set fans to 100% on exit” just in case you accidentally shut down SpeedFan – this is another protective feature.
Finishing up
Click “OK” on the configuration page to save your changes, which should bring you back to the main window. Then, make sure “Automatic Fan Speed” is checked here, and your system should now be set up for automatic fan control! I have been using SpeedFan for a few years and wasn’t aware of this functionality until recently. Just goes to show that you can always learn new things!
overclocking maybe nice but it could destroy your PC in a matter of hours. :
My own, personal web portal
http://www.homeimprovementstuffs.com/why-you-should-use-eyelet-curtains/
All you guys with laptops and hightowers, remember to clean your graphic card and processor fans from dust. This means you have to detach the fans carefully and blow on it and in some cases use a toothbrush or something to get into those small openings. Problems with overheating laptops is often due to accumulated dust infront of the suction. Clean that out and it ll be running nice and cool again.
All you guys with laptops and hightowers, remember to clean your graphic card and processor fans from dust. This means you have to detach the fans carefully and blow on it and in some cases use a toothbrush or something to get into those small openings. Problems with overheating laptops is often due to accumulated dust infront of the suction. Clean that out and it ll be running nice and cool again. Don t forget to replace the cooling paste which you put on the processor so it wont get overheated. Sometimes it also helps to change the paste since alot of the times the old paste tends to completely dry up and crack into powder. I do this to my laptop and desktop computer every 3 to four months.
hi,
i have HP 4530s probook with extremly nois fan, i instal speedfan 4.46 but tabs speed and fan are empty without any information please help me
I recommend you using RivaTuner to control your fan speed. Otherwise I think you may need to get a new fan if its making alot of noise.
http://downloads.guru3d.com/download.php?det=163
Yes I totally agree with you on that point. Desktop CPUs are practically for free ha 🙂 many of them are so cheap.
Old but gold! Just downloaded SpeedFan today and found your nice guide. Thank you, finally my computer is a little less noisy. 🙂
my version no work totally.
no show my speeds.
🙁
help!
This is way more complex than it needs to be. Every single guide is telling me how it works for them, but in my case it will be different so i just need to figure it out. That doesn’t help me, i would rather just set my fan speed manually to 100 since my smart motherboard which is supposed to control temperature and shit isn’t doing it’s job at all. No luck playing with bios either. Help me out i don’t want my computer to fry, my fans are going really slow and i been struggling with speedfan all day, i’m officially pissed off.Computer keeps restarting
I installed Speedfan and my CPU fan went to 100% and hasn’t slowed down since. I’ve uninstall and reinstalled a couple dozen times and now I’m stuck. How do I get my default original settings back. The programmer Alfredo is useless and doesn’t want to help unless you are an electrical engineer. My fan is loud as hell and I want my original variable speed fan settings back. I’ve seen several people with this issue, specifically with the Super IO chip IT8728F, but no resolutions. any help from here would be appreciated.
Is it possible to damage a computer with utility like SpeedFan?
now im at a aa 5552g laptop with msi afterburner. now you can set it up to 100% in latest verion this day. dust in fans can be best using a vacum cleaner in gpu cpu fans. it helped me to get the temp down from 90 to 46 c+.
Every time I open Fan Speed I get a debug and a speedfan file appear on screen. I keep deleting but it reappears again when opening speed fan. Is there any way to disable this.
Regards
Roger Ferguson
Haha great article. This reminds me of the time I had reflowed two 3870 Crossfired cards and a 9500gt card for a friend. One worked fine for another 3-4 months and it was great. When summer came along one card died. The other 3870 would last me until the winter before dying as well.
Hello,
Thanks to you for your complete tutorial
My CPU cable is not connected to power supply but is connceted to motherboard.
But the CPU fan header on the motherboard is 4-pin.
So, can Speedfan control my fan speed?
Yours
This manual is outdated.
To activate automatic mode in SpeedFan 4.51 go to “Configure” –> “Fan Control” (new tab) –> “Add” –> type your name –> Double click on an entry –> select fan (CPU0 in my case) –> select CPU and all cores.
If I select “MAX of speeds” fan speed jup up and down between 51% and 100% even if computer doing nothing.
If I select “SUM of speeds” fan running at 100%.
It was on G41M-GS3 motherboard (Q8300 processor).
On Asus P8Z68V-pro and i865p SpeedFan can’t control speed of ventelator at all, so no reason even to try automatic mode.
On Asus board you can use “Fan Xpert2”. It is much more flexible in programming ventilators then SpeedFan, but also has a lot of room for improvements.